
Installing gutters can seem daunting, but it’s quite manageable with the right steps. Properly installed gutters protect your home from water damage.
Gutters are essential for directing rainwater away from your home. Without them, water can damage your roof, walls, and foundation. Learning to install gutters yourself can save money and ensure they are fitted to your specific needs. In this guide, we will break down the process into simple steps.
You will learn about the tools you need, how to measure and cut the gutters, and the best way to secure them. With clear instructions, even a beginner can handle this project. So, let’s get started on making your home safer and more resilient against water damage.
Tools Needed
Installing gutters is a vital part of home improvement, ensuring effective rainwater management and protecting your home from water damage. Whether you’re tackling a DIY gutter installation or hiring a professional, having the right tools is essential. This guide will help you understand the necessary tools for a seamless gutter installation, as well as some optional tools that can make the job easier and more efficient.
Essential Tools
To get started with gutter installation, you’ll need several essential tools. These tools are crucial for ensuring a smooth and effective installation process.
- Measuring Tape: Accurate measurements are crucial. A measuring tape helps you measure the length of the gutter sections and the distance between brackets.
- Level: Ensuring the gutters are level is key to proper water flow. A level will help you achieve the correct slope.
- Hacksaw or Tin Snips: Cutting gutters to the correct length is necessary. A hacksaw or tin snips can make precise cuts.
- Drill and Drill Bits: You’ll need a drill to create holes for screws and brackets. Ensure you have the correct drill bits for metal or plastic gutters.
- Screwdriver: A screwdriver is essential for securing brackets, end caps, and other components.
- Caulk Gun and Sealant: Sealing joints and seams prevents leaks. A caulk gun and sealant are necessary for this task.
- Safety Gear: Safety is paramount. Wear gloves, safety glasses, and a sturdy ladder to protect yourself during installation.
These essential tools are the backbone of any gutter installation guide. Having them on hand ensures a smooth and efficient process, making your home improvement project easier and more effective.
Optional Tools
While the essential tools cover the basics, several optional tools can further simplify the gutter installation process. These tools can enhance efficiency and accuracy, making your DIY gutter installation even smoother.
- Gutter Crimper: A gutter crimper helps create tight, secure joints in seamless gutters. This tool ensures a leak-free roof drainage system.
- Pop Rivet Gun: This tool is handy for fastening gutter sections together. It provides a strong, durable connection.
- Chalk Line: A chalk line helps mark straight lines on the fascia. This ensures precise alignment of gutters.
- Gutter Scoop: Cleaning debris from the gutters is easier with a gutter scoop. It simplifies gutter maintenance.
- Heat Gun: A heat gun can shape and bend plastic gutters. This tool is useful for custom fits and tricky angles.
- Extension Ladder: An extension ladder provides extra height and stability. It’s crucial for reaching higher rooflines safely.
These optional tools are not mandatory but can significantly enhance the efficiency and accuracy of your gutter installation. Incorporating them into your toolkit can make your home improvement project smoother and more enjoyable.
Choosing Gutters
Installing gutters is crucial for effective rainwater management and home drainage. Choosing the right gutters ensures your system works efficiently and lasts longer. Here’s a guide on choosing the best gutters for your home.
Material Options
Gutter materials impact durability, cost, and aesthetics. Various options suit different needs and budgets. Here are some common gutter materials:
- Aluminum: Lightweight, rust-resistant, and easy to install. Ideal for DIY gutter installation. Available in various colors and styles.
- Vinyl: Affordable and easy to install. Resistant to rust and corrosion. May become brittle in extreme temperatures.
- Steel: Strong and durable. Can withstand heavy rainfall and snow. Prone to rust without proper maintenance.
- Copper: High-end and long-lasting. Develops a patina over time. Expensive and requires professional gutter installation.
- Zinc: Durable and low-maintenance. Develops a protective layer over time. Costly but long-lasting.
| Material | Pros | Cons |
|---|---|---|
| Aluminum | Lightweight, rust-resistant, easy to install | Can dent easily |
| Vinyl | Affordable, rust and corrosion resistant | May become brittle |
| Steel | Strong, durable, handles heavy rainfall | Prone to rust |
| Copper | Long-lasting, develops patina | Expensive, needs professional installation |
| Zinc | Durable, low-maintenance | Costly |
Sizing Guide
Proper gutter sizing is essential for effective rainwater management. The size depends on your roof area, slope, and local rainfall intensity. Here’s how to determine the right size:
- Measure Roof Area: Calculate the total square footage of your roof. Multiply the length by the width of each roof section.
- Determine Roof Pitch: Measure the pitch to understand the slope. A steeper roof requires larger gutters.
- Local Rainfall Intensity: Check local rainfall data. Higher rainfall needs larger gutters for efficient home drainage.
Here’s a general guide for gutter sizing:
| Roof Area (sq ft) | Gutter Size (inches) | Downspout Size (inches) |
|---|---|---|
| Up to 1,000 | 5 | 2 x 3 |
| 1,000 – 2,000 | 6 | 3 x 4 |
| 2,000 – 3,000 | 7 | 3 x 4 |
Seamless gutters are a popular choice. They reduce leaks and require less gutter maintenance. Custom-fit to your home, they offer better performance and aesthetics.
Downspout installation is also crucial. Ensure downspouts are correctly sized and placed to direct water away from your home’s foundation.
Preparation Steps
Installing gutters is an essential home improvement project that helps manage rainwater effectively. Proper preparation is crucial for a successful DIY gutter installation. This guide will walk you through the essential preparation steps, ensuring your gutter system is efficient and long-lasting.
Measuring Roofline
Accurate measurement of your roofline is the first step in your gutter installation project. Begin by measuring the length of each section of the roofline where you plan to install gutters.
Here’s how to measure your roofline:
- Use a sturdy measuring tape or a laser measurer for precise measurements.
- Measure the length of each horizontal edge of the roof, including any sections around corners or gables.
- Record the measurements carefully, noting the length of each section.
Consider any overhangs or extensions in your measurements. These areas will need gutter coverage as well. It’s also important to measure the height where the downspouts will be installed. This ensures you have the right length of downspout material.
Accurate measurement of your roofline helps in purchasing the right amount of materials. It also ensures the gutter system fits perfectly, enhancing your home’s roof drainage system.
Planning Layout
After measuring the roofline, the next step is planning the layout for the gutter system. Proper planning ensures efficient rainwater management and compliance with building codes for gutters.
Here are the key steps:
- Identify Downspout Placement: Determine the best locations for downspouts. They should be placed at the corners of the house and in areas where water naturally flows.
- Calculate Gutter Slope: Ensure your gutters have a slight slope towards the downspouts. This slope helps water flow efficiently.
- Select Gutter Style: Choose the type of gutter that suits your home’s design and your budget. Options include K-style and half-round gutters.
- Plan for Gutter Hangers: Decide on the spacing of gutter hangers. They should be placed every 2-3 feet for stability.
Proper planning also involves considering any obstacles or unique features of your home. For instance, large trees near your roof might require gutter guards to prevent clogging. If your home has a complex roofline, you may need additional connectors or special fittings.
By carefully planning the layout, you ensure that the gutter system effectively directs water away from your home, preventing water damage and maintaining the integrity of your roof.
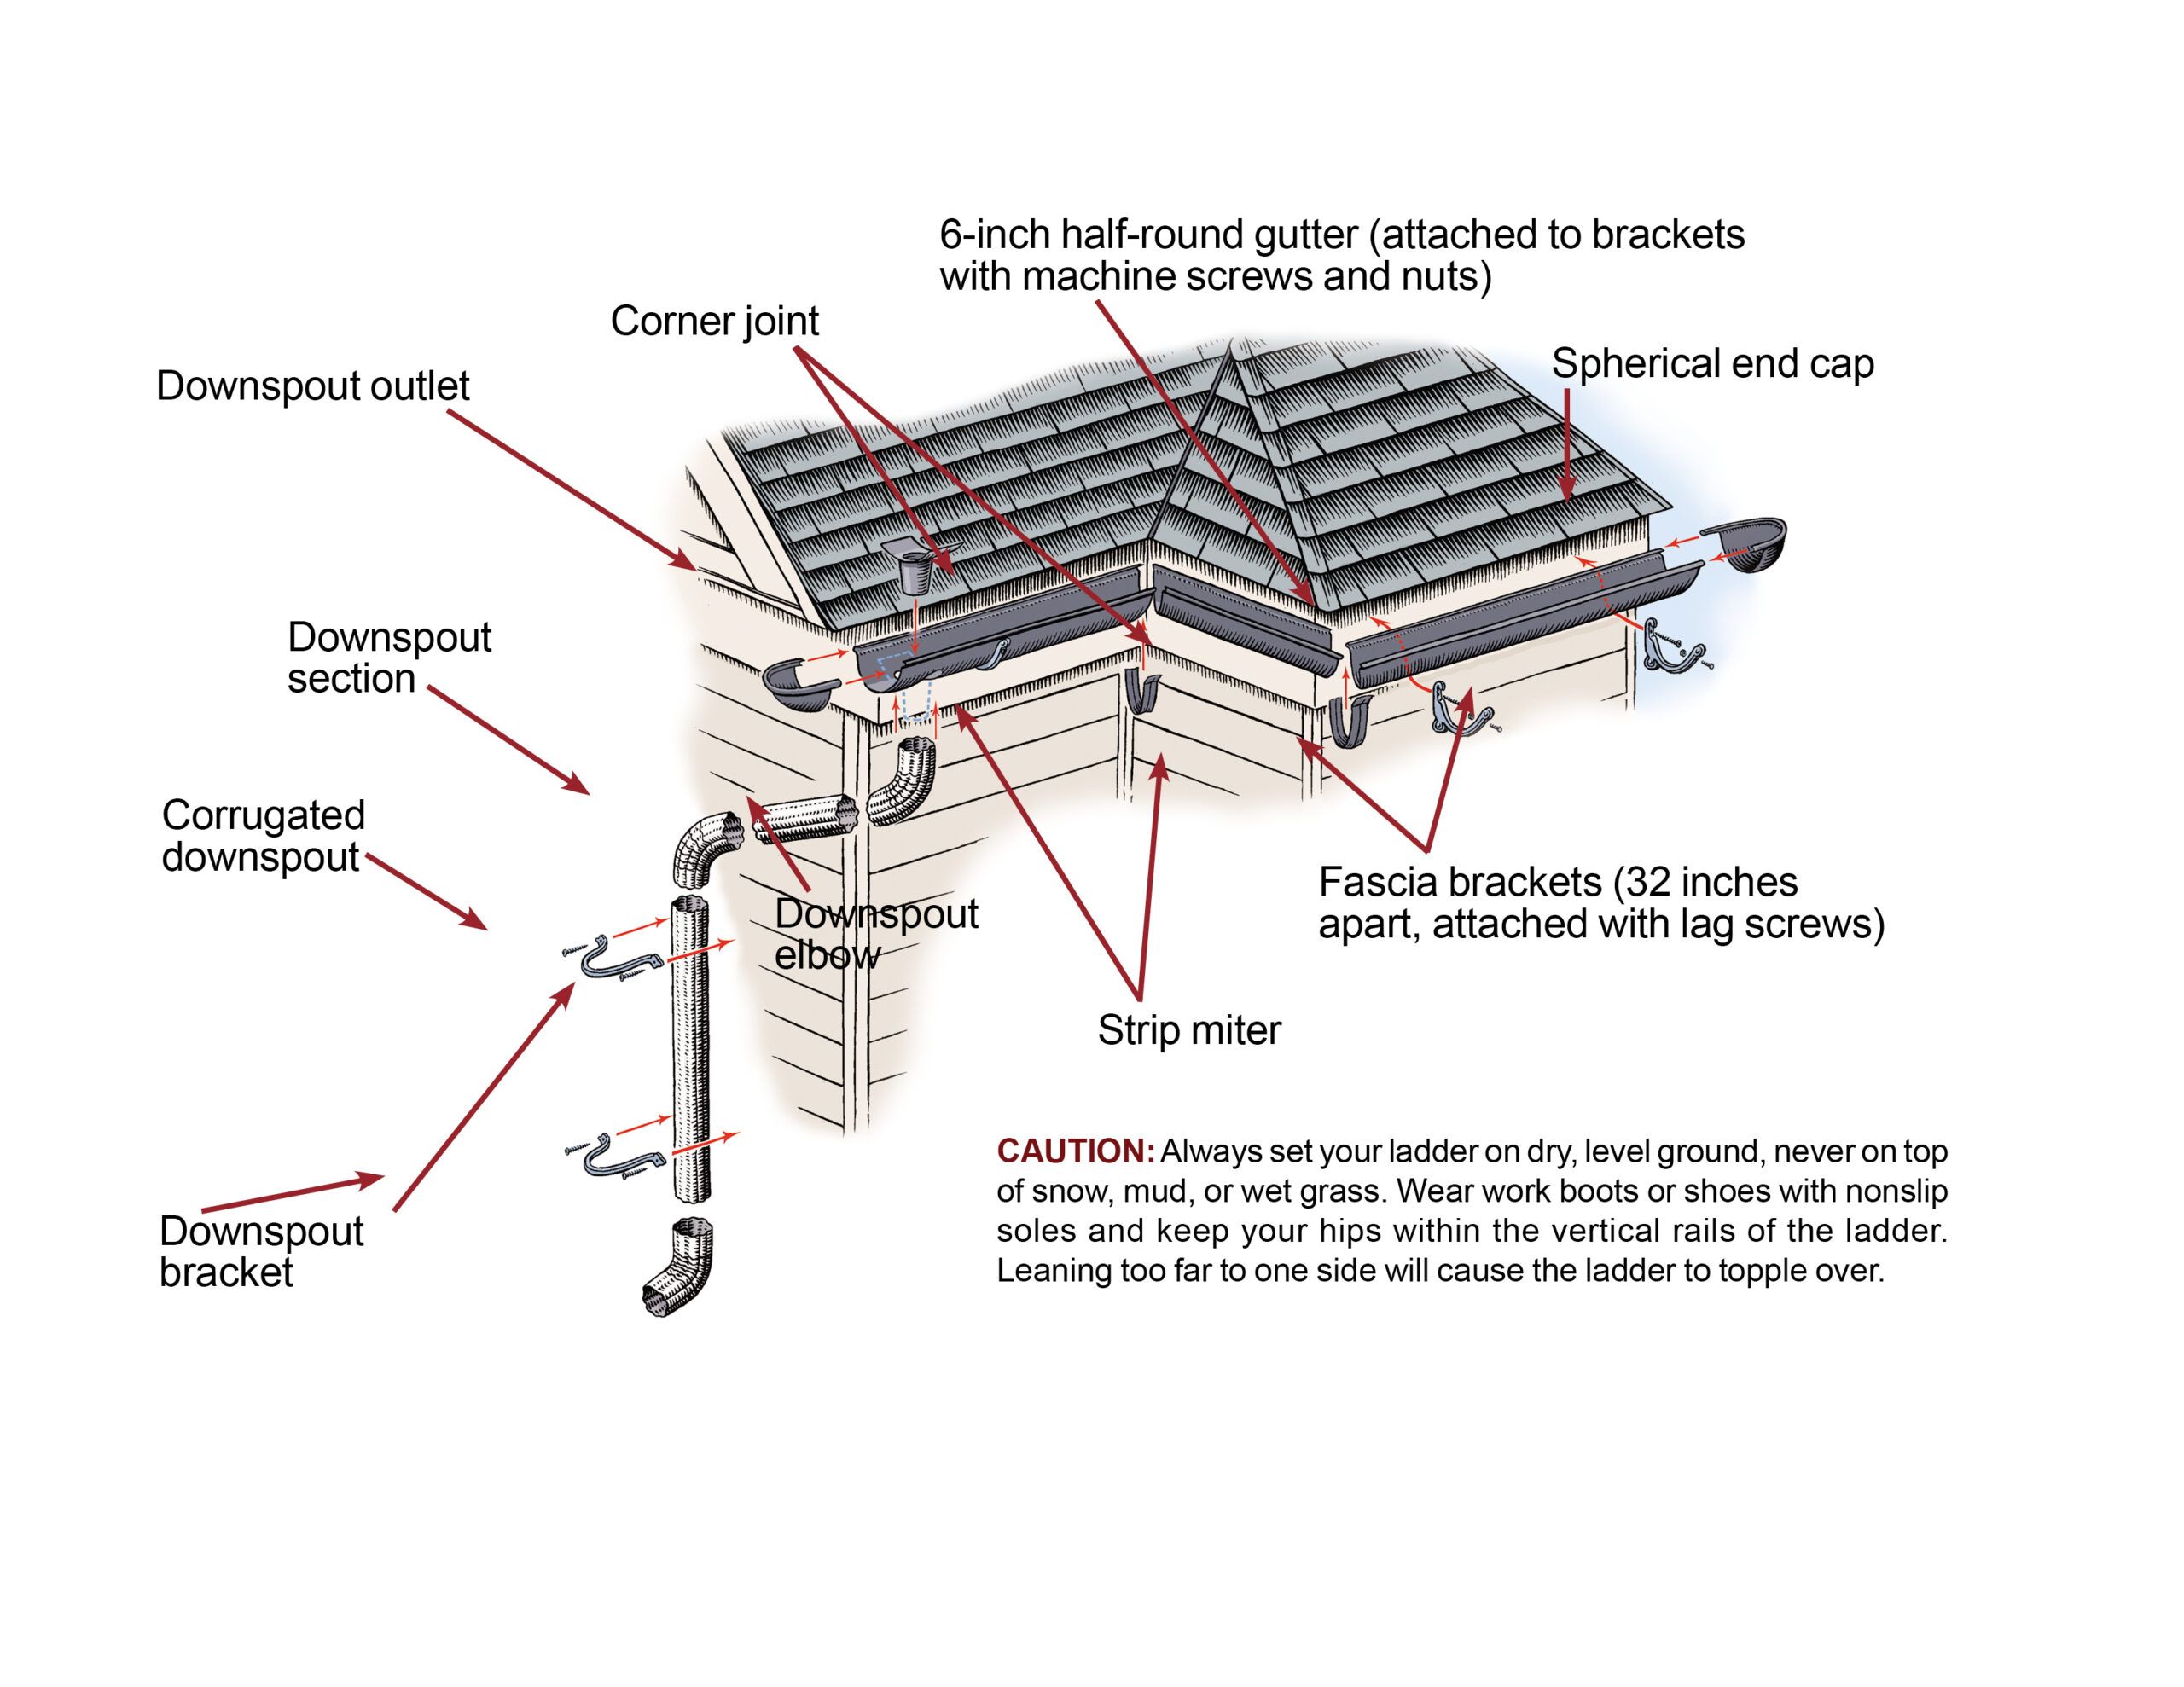
Installation Process
Installing gutters is an essential part of maintaining your home. Gutters help manage rainwater and prevent water damage. The installation process may seem daunting, but with the right tools and techniques, you can accomplish this home improvement task efficiently. This guide will walk you through the steps of mounting gutters and securing downspouts.
Mounting The Gutters
Mounting gutters is a crucial step in ensuring effective roof drainage and rainwater management. To start, gather all necessary tools and materials. You will need gutter sections, brackets, screws, a measuring tape, a level, and a drill. Follow these steps to mount your gutters:
- Measure the Roof: Begin by measuring the length of the roof where the gutters will be installed. This helps in determining the length of the gutter sections needed.
- Cut the Gutters: Using a hacksaw, cut the gutter sections to the measured length. Ensure smooth edges to avoid injury and ensure proper fit.
- Attach the Brackets: Brackets support the gutters and should be spaced about 2 feet apart. Mark the spots for the brackets and screw them into place using a drill.
- Position the Gutters: Place the gutter sections into the brackets, ensuring they are slightly angled towards the downspout. This slope helps in efficient water flow.
- Secure the Gutters: Use screws to secure the gutters to the brackets. Check for stability and make adjustments if necessary.
Proper gutter mounting techniques ensure that your gutter system is stable and effective. By following these steps, you can achieve a successful gutter installation, enhancing your home’s exterior maintenance and overall drainage solutions.
Securing The Downspouts
Securing the downspouts is the next step in the gutter installation process. Downspouts direct water from the gutters to the ground, preventing water damage to your home’s foundation. Here are the steps to secure downspouts effectively:
- Determine Downspout Placement: Identify where the downspouts will be positioned. Typically, downspouts are placed at the corners of the house or wherever water flow needs to be managed.
- Attach the Downspout Outlets: At the end of each gutter section, attach a downspout outlet. Ensure it is securely fastened and aligned with the gutter.
- Cut the Downspouts: Measure the distance from the outlet to the ground and cut the downspout sections accordingly. Make sure the cuts are precise for a tight fit.
- Connect the Elbows: Use elbows to navigate the downspout around any obstacles. Secure the elbows with screws to ensure they stay in place.
- Fasten the Downspouts: Attach the downspouts to the wall using brackets. Place brackets every 6-8 feet to ensure stability. Screw the brackets into the wall and secure the downspout sections.
- Check for Leaks: Once the downspouts are installed, run water through the system to check for leaks. Make adjustments as needed to ensure a watertight fit.
By following these steps, you can effectively secure your downspouts, completing your DIY gutter installation. Proper downspout placement and secure fastening are essential for a reliable gutter system and effective rainwater management.
Sealing And Testing
Installing gutters is an essential task for effective rainwater management. Proper sealing and testing ensure longevity and functionality. This section covers the critical steps of sealing and testing your new gutters. Follow these guidelines to ensure your DIY gutter installation is successful.
Applying Sealant
Sealing your gutters is crucial for preventing leaks and ensuring efficient water diversion. Follow these steps for effective gutter sealing:
- Clean the joints: Before applying sealant, clean the joints and seams with a wire brush. Remove any debris or old sealant to ensure a smooth surface.
- Choose the right sealant: Use a high-quality gutter sealant specifically designed for outdoor use. It should be weather-resistant and flexible.
- Apply the sealant: Using a caulking gun, apply the sealant generously to all the joints and seams. Ensure you cover every gap to prevent leaks.
- Smooth the sealant: Use a putty knife or your finger to smooth the sealant. This helps in creating a watertight seal.
- Allow drying time: Let the sealant dry as per the manufacturer’s instructions. This usually takes around 24 hours. Avoid any water contact during this period.
Proper sealing is vital for your gutter installation. It prevents water from seeping through the joints and ensures effective roof drainage. Regular gutter maintenance, including checking and reapplying sealant, keeps your gutters functioning optimally.
Water Flow Test
Testing your gutters after sealing ensures they are working correctly. Conduct a water flow test to check for leaks and proper water diversion:
- Prepare for the test: Get a garden hose and position it at the highest point of your gutter system.
- Simulate rainfall: Turn on the hose and let the water flow through the gutters. This simulates heavy rain conditions.
- Observe the flow: Watch the water as it flows through the gutters. Ensure it moves smoothly towards the downspouts without pooling.
- Check for leaks: Inspect all joints and seams for any signs of leakage. If you notice any leaks, mark the areas for resealing.
- Inspect downspout placement: Ensure the downspouts are directing water away from the foundation. Proper downspout placement prevents water damage to your home.
If leaks are detected, apply more sealant to the affected areas and repeat the water flow test. Seamless gutters often have fewer joints, reducing the risk of leaks. Consistent testing as part of your gutter maintenance routine ensures reliable rainwater management and protects your home from water damage.

Maintenance Tips
Installing gutters is a crucial part of home improvement. It helps in managing rainwater effectively. But the job doesn’t end with installation. Regular maintenance is key to ensuring your gutters work properly. Here are some essential maintenance tips to keep your gutters in top shape.
Cleaning Gutters
Cleaning gutters is one of the most important parts of gutter maintenance. It prevents clogs and ensures water flows smoothly through the system. Here’s how to keep your gutters clean:
- Remove debris: Use a small trowel to scoop out leaves, twigs, and dirt.
- Flush with water: Use a garden hose to rinse the gutters and downspouts.
- Use a ladder: Always use a sturdy ladder and have someone spot you for safety.
Cleaning should be done at least twice a year, preferably in the spring and fall. For homes surrounded by trees, more frequent cleaning might be necessary.
| Cleaning Frequency | Recommended Time |
|---|---|
| Twice a Year | Spring and Fall |
| More Often | For homes with many trees |
Keeping your gutters clean helps in maintaining efficient water drainage solutions. It prevents water damage to your roofing systems, walls, and foundation.
Inspecting For Damage
Regular inspection is vital for effective gutter maintenance. It helps in identifying potential issues before they turn into costly repairs. Here’s what to look for:
- Check for cracks and holes: Small cracks can lead to leaks, causing water damage.
- Look for rust: Rust can weaken the gutter structure, leading to breaks.
- Inspect downspouts: Ensure they are securely attached and free from blockages.
Inspect your gutters after heavy rain. This helps in spotting any immediate issues. If you find any damage, consider diy gutter installation or gutter repair to fix the problems.
Here’s a quick checklist for gutter inspection:
- Look for loose or sagging gutters.
- Check for water marks on the exterior walls.
- Ensure all brackets and screws are tight.
- Inspect the ground around your home for signs of water damage.
Regular inspections help in maintaining your gutter installation. It ensures your exterior home maintenance is on point. By doing this, you protect your home from potential water damage and keep your roofing systems in good condition.
Common Mistakes
Installing gutters might seem simple, but common mistakes can lead to costly repairs. Knowing what to avoid is just as crucial as knowing how to install them. Let’s explore some of these mistakes in detail.
Incorrect Measurements
Incorrect measurements are a major issue in DIY gutter installation. Accurate measurements ensure proper water drainage system function. Measuring gutters incorrectly can lead to improper fit and function.
When measuring for gutters, consider the following:
- Length of the roofline: Measure the length where the gutter will be installed. Ensure the measurement is accurate.
- Slope of the gutter: Gutters need a slight slope to ensure water flows towards the downspout. Measure the slope carefully.
- Downspout placement: Plan where the downspouts will be placed. Measure the distance from the gutters to the ground.
Here is a quick reference table for common measurements:
| Measurement Type | Importance |
|---|---|
| Roofline Length | Ensures gutter fits properly |
| Gutter Slope | Ensures proper water flow |
| Downspout Distance | Ensures effective water drainage |
Incorrect measurements can lead to water overflow, damaging the roofing and gutters. Always double-check your numbers. Use a reliable measuring tape and follow standard practices to avoid errors.
Poor Sealing Techniques
Gutter sealing is critical. Poor sealing techniques lead to leaks and water damage. Proper sealing ensures the longevity of your gutter system.
Common sealing mistakes include:
- Using the wrong sealant: Not all sealants are suitable for all gutter types. Choose a sealant recommended for your gutter material.
- Inadequate application: Apply sealant generously to all joints and seams. Thin applications can fail under pressure.
- Ignoring drying times: Allow the sealant to dry completely before testing the system. Rushing this process can compromise the seal.
Here is a checklist for proper gutter sealing:
- Clean surfaces: Ensure all surfaces are clean and dry.
- Apply sealant evenly: Use a caulking gun for even application.
- Check for gaps: Inspect joints for any missed spots.
- Allow proper drying time: Follow manufacturer instructions for drying times.
Proper sealing techniques prevent leaks and ensure the efficiency of your water drainage system. Gutter maintenance also includes regular checks on seals, especially after heavy rains. This ensures your home improvement projects stand the test of time.

Frequently Asked Questions
What Tools Are Needed To Install Gutters?
You need a ladder, tape measure, drill, screws, and a gutter kit.
How Long Does It Take To Install Gutters?
It usually takes around one day for an average-sized house.
Can I Install Gutters By Myself?
Yes, you can. Just follow the instructions and take safety measures.
What Is The Best Material For Gutters?
Aluminum is popular. It’s durable, rust-resistant, and easy to install.
How Often Should Gutters Be Cleaned?
Clean gutters twice a year to prevent clogs and water damage.
Conclusion
Installing gutters enhances your home’s protection. It keeps water damage at bay. Follow the steps carefully. Use the right tools. Keep safety in mind. Regular maintenance ensures longevity. A well-done job saves future repair costs. Enjoy a dry, safe home.
Ready to start? Your home will thank you.